Icons are a great way to turn standard text into simple visualizations. In your merge templates, you can incorporate icons in many ways.
Merge templates can be created in MS Word, Excel, PowerPoint, or PDF. For my examples, I will be using MS Word because it is the platform of preference for most use cases I come across.
When I talk about icons, what I really mean for the purpose of merge template editing, is icon fonts. There are a ton of icon fonts available to you, but the default ones that come with most Microsoft Office installations are:
-
Webdings
-
Wingdings
-
Wingdings 2
-
Wingdings 3

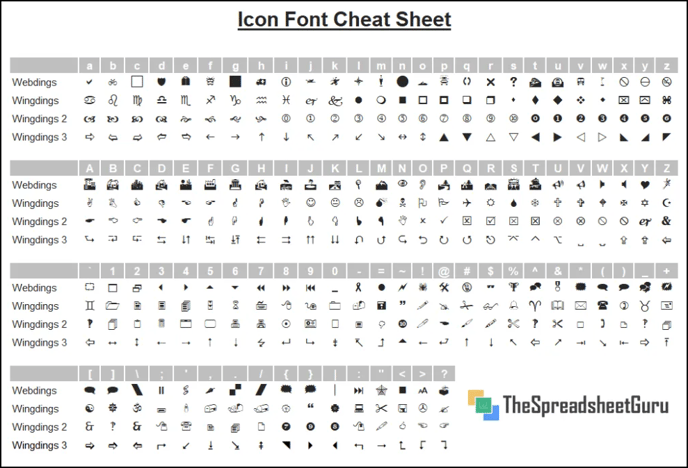
Just like changing any other font, you can highlight the text you want to change and select one of the icon fonts to change it. If you try this on normal text, you will probably see some weird results. That's because each character has a specific icon associated to it depending on the icon font selected. Below is a cheat sheet to help:
Examples
The most common cases for turning text to icons in merge templates include checkbox fields and picklist fields. This is because users are selecting an option instead of typing whatever they want. By restricting what users can input, you can easily map their answers to icons.
Checkbox example
If you have a checkbox on your form with a label of "Complete", you might want to convert a check to a filled-in box and a non-check to an empty box.
If you look at the "Icon Font Cheat Sheet", you will see:
-
Wingdings lowercase x - box with x inside
-
Wingdings lowercase o - empty box
In merge, checkboxes will give an output of "Yes" for checked and "No" for unchecked. Therefore, we will have to use smarty tags to convert each answer to a single character.
{if $projectteam_0001 == 'Yes'}x{else}o{/if}
In the above example, I say "if the answer is yes, put an x... otherwise put an o". I got the "x" and "o" characters from the "Icon Font Cheat Sheet" above.
If I were to run the merge just as I show, then all I will get back is a literal x and o in the appropriate areas. To get the characters to be icons, highlight the characters and format those to be the Wingdings font. So your merge template should look like this:
Note: Only make the characters the icon font, do not change the actual tags. If you change the tags, the merge template will not work.
Picklist example
For fields that have more than two options, such as a picklist, you'll have to use an if/elseif/else statement. A good example of this might be merging a field report with weather conditions to an output.
You might have a "Weather Condition" picklist with three options:
-
Sunny
-
Rain
-
Snow
In your output, you'd like to show an icon in place of the words to provide a little more interest. In a similar way, we added the "if" statement for the checkbox example, we'll add one based on our three options:
{if $projectteam_0001 == 'Sunny'}
R
{elseif $projectteam_0001 == 'Rain'}
S
{else}
T
{/if}

Or

{if $projectteam_0001 == 'Sunny'}R{elseif $projectteam_0001 == 'Rain'}S{else}T{/if}
The "R", "S" and "T" characters added within the merge tags are based on the "Icon Font Cheat Sheet" above. In this example, I'm using:
-
Wingdings uppercase R - sun icon
-
Wingdings uppercase S - rain drop icon
-
Wingdings uppercase T - snowflake icon
My example has this "Weather Condition" field within a collection. Using our knowledge of setting up collections in our merge templates, we can get a final result that looks something like this:

Note: I also color-coded my icons which can be done simply by adding a text color to each option within your if/elseif/else statement.