Setting up a Project Template
Setting up project templates is easy to do and can help save time when creating new projects.
Background
Each project in ProjectTeam.com can include a lot of setup steps. You can set up features such as forms, folder structures, workflows, users, permissions, account codes, reports, merge templates, and more. Instead of having to set up these features every time you have a new project, you can use project templates.
It is recommended that your company is the only company on your project templates. Information that is copied over upon creating a new project from a template is limited to the features set up by your company.
There is no dedicated area called "Project Templates", it's really just an attribute of a project. Therefore, you can mark a project available as a template at any point.
Note: You can only mark projects created by your company available as a template. Therefore, if you've been invited to a project by another company, you cannot use that project as a template (However, you can still apply company form customizations to that project for cross-project reporting).
Making a project available as a template
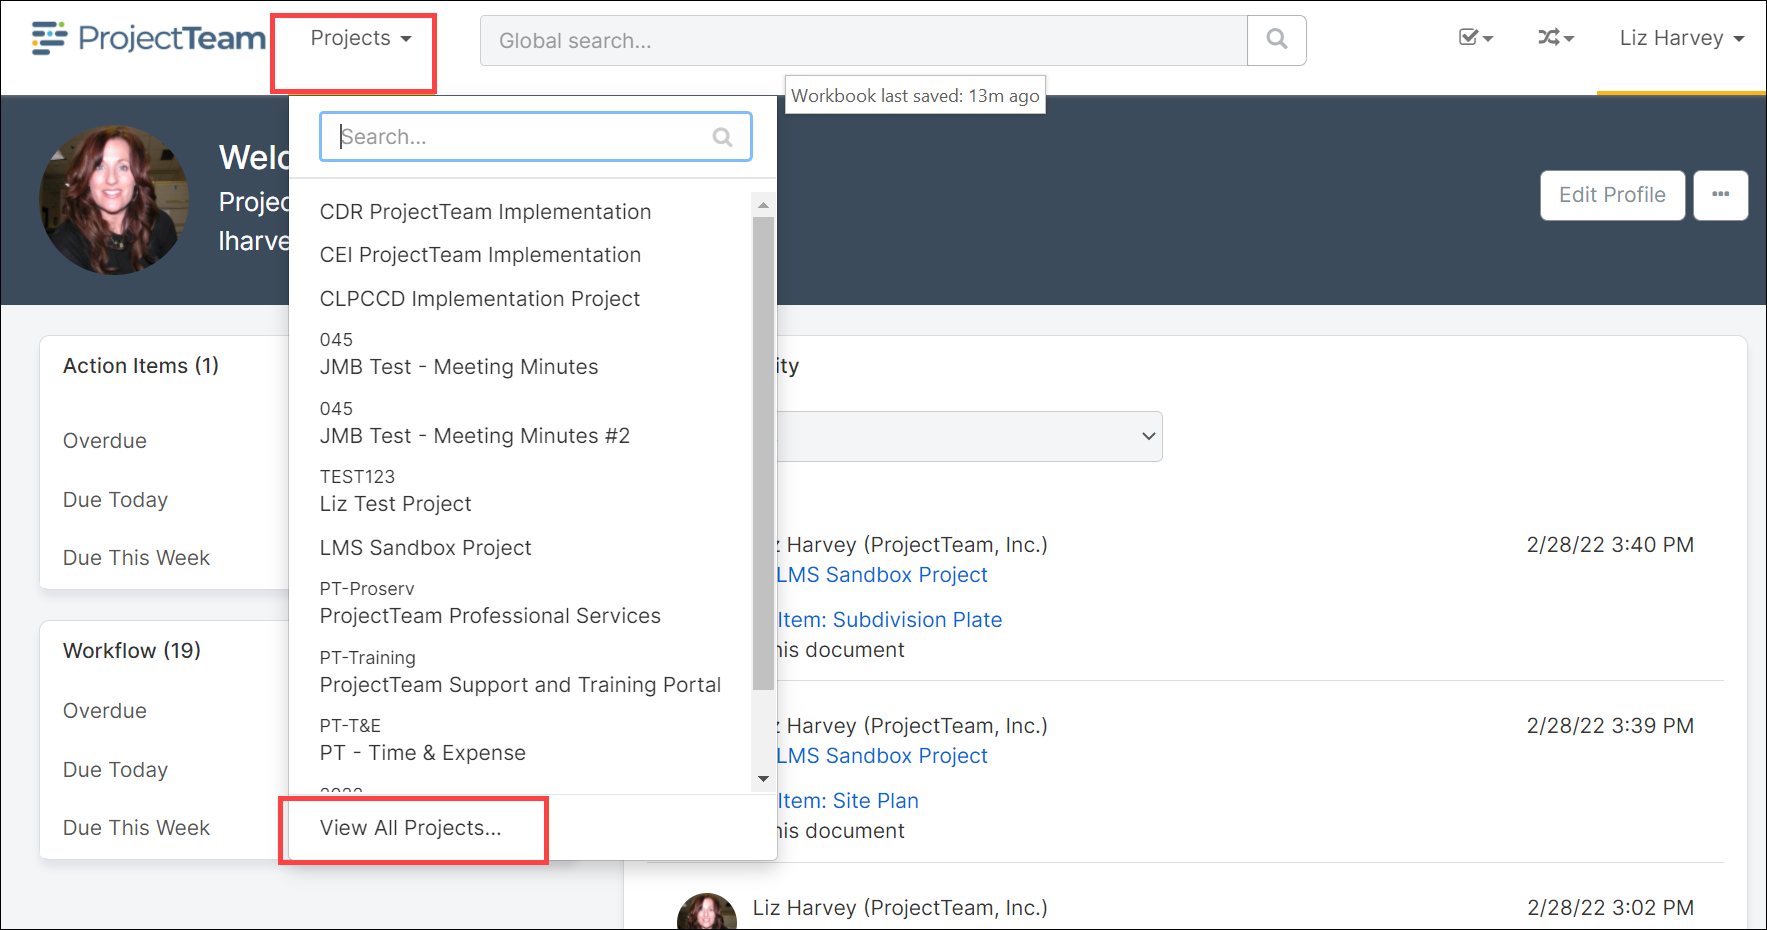
1. Navigate to your View All Projects page by clicking the Projects dropdown on the main navigation bar

2. In the project list, filter by your company, and click the project you'd like to mark as a template (or create a new project)
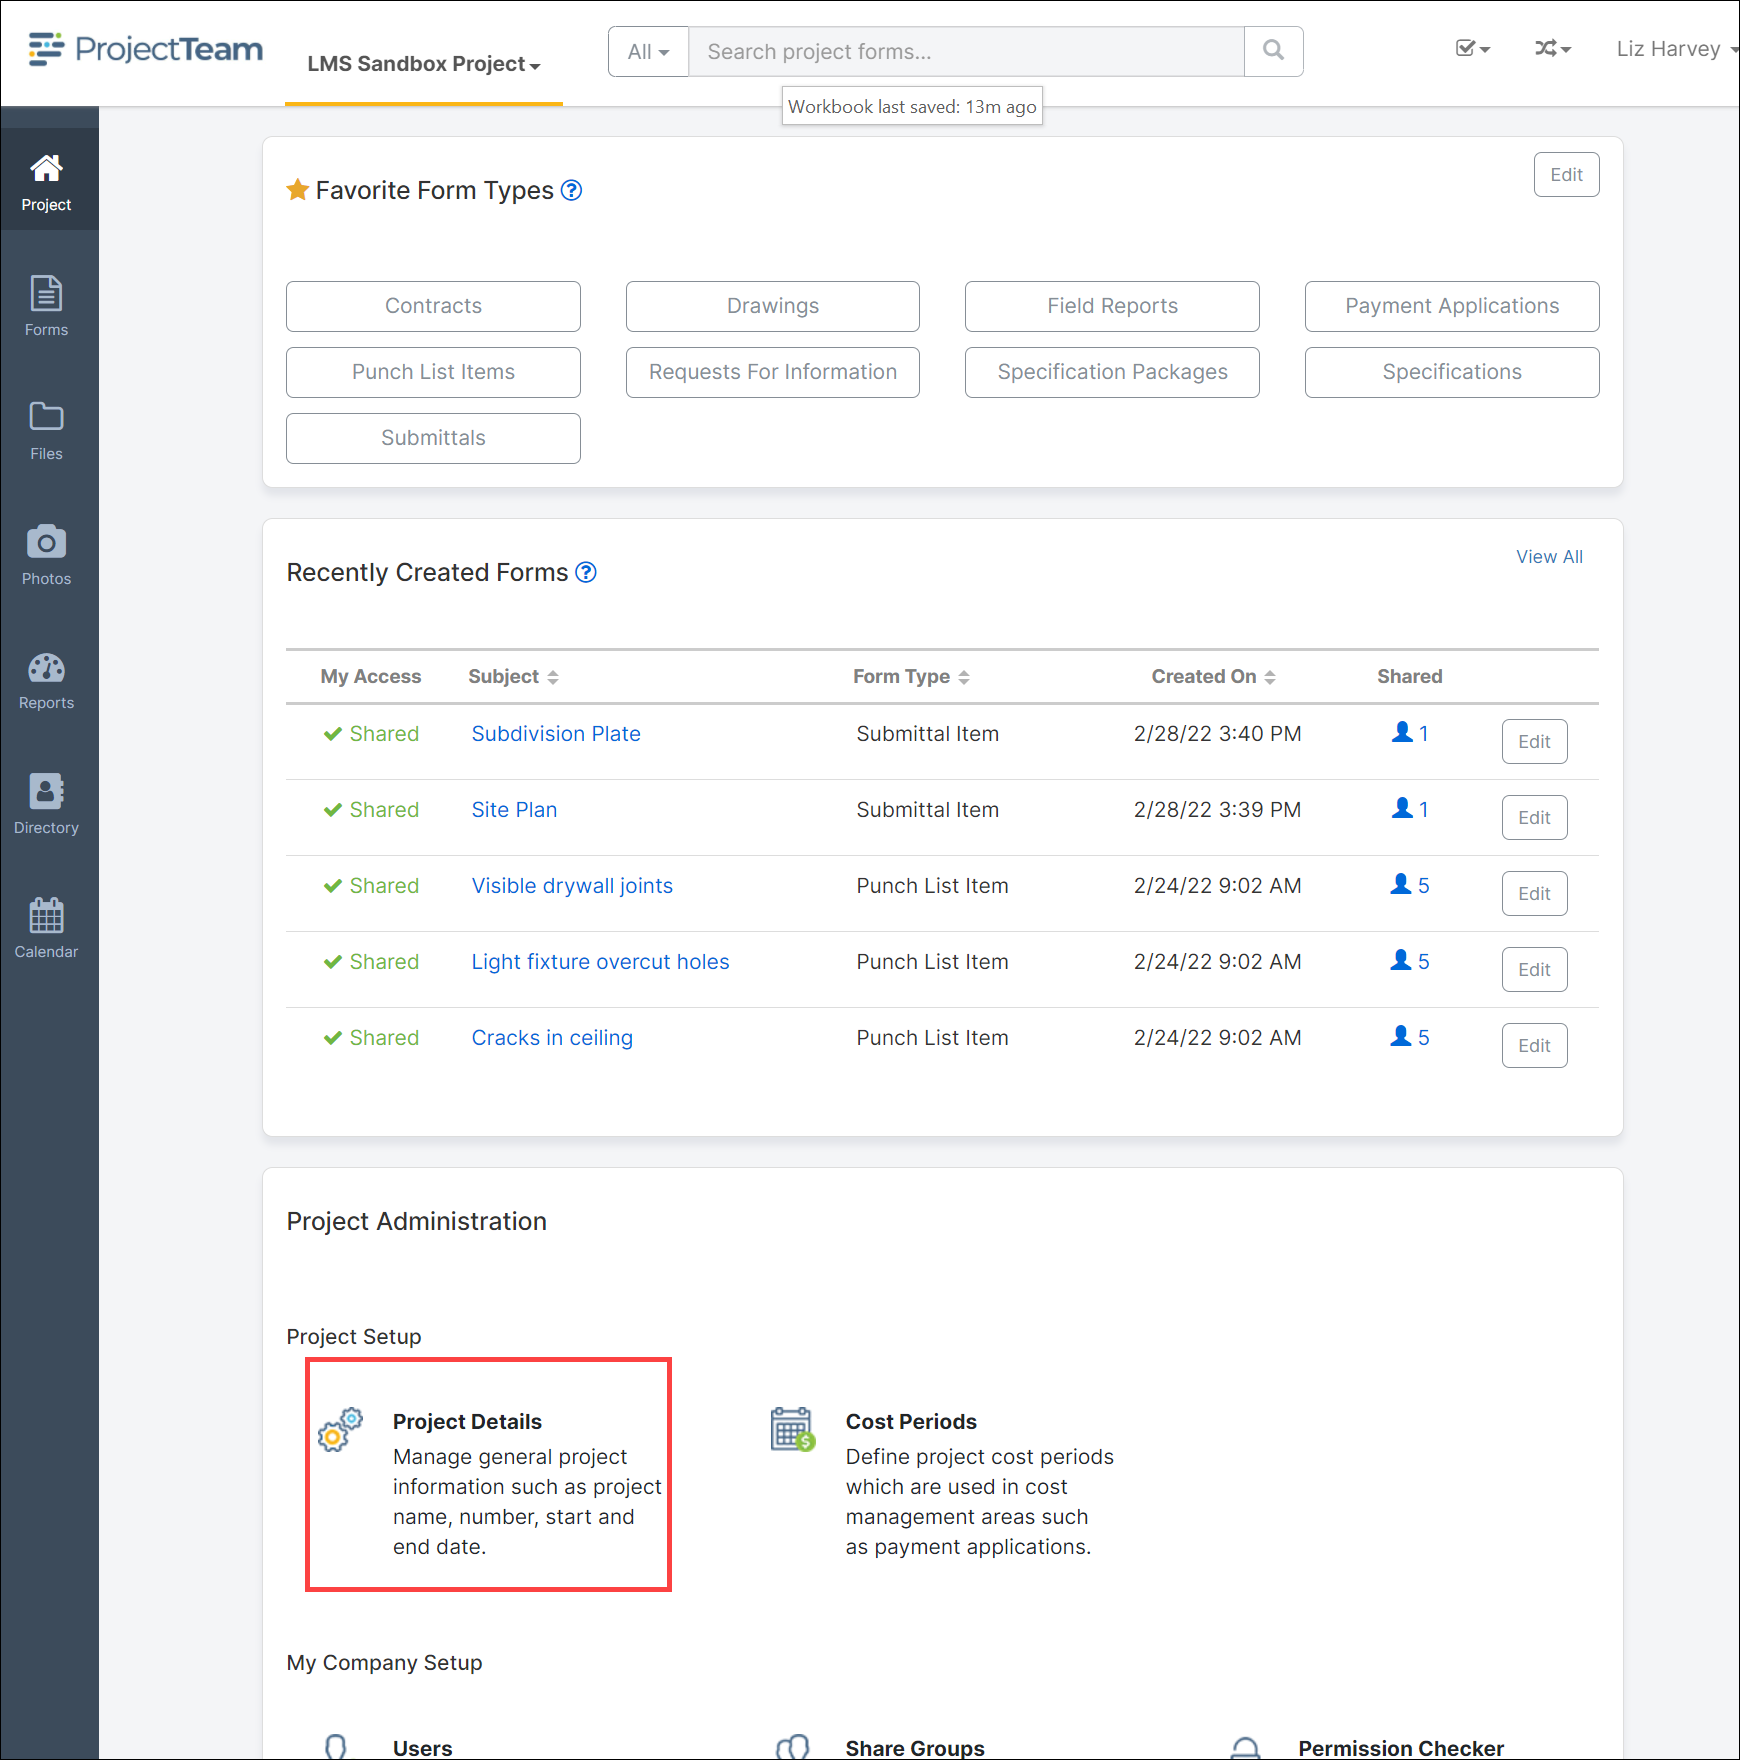
3. On the project homepage, in the Project Administration area, click the Project Details option

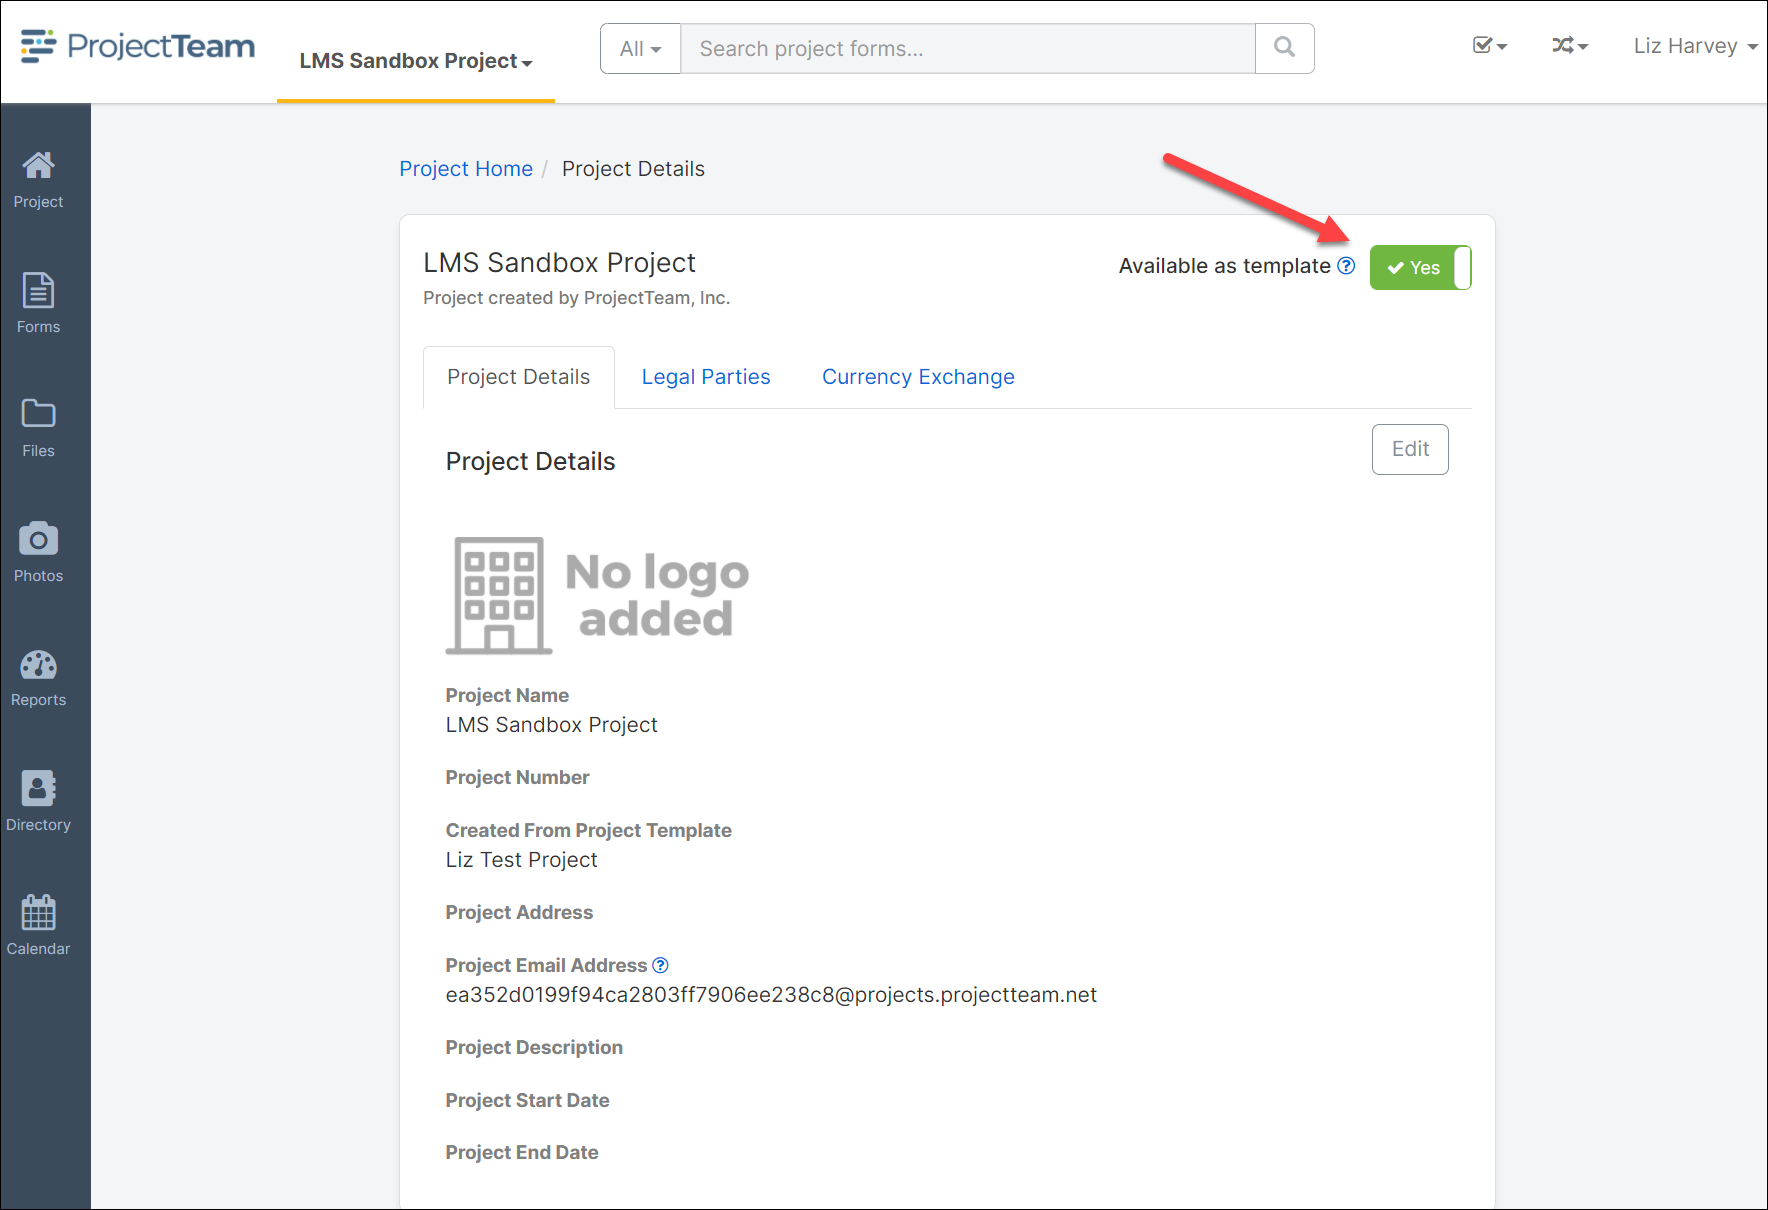
4. On the project details page, click the Available as template toggle

Your project is now available as a template. When users from your company create new projects going forward, they will see your project in the list of templates.
Note: You can toggle the template on or off at any point. So if you're not ready to make the project an official template yet, just click the toggle again to make it not available as a template.
What's included in a Project Template?
The purpose of a project template is to help you quickly create new projects based on what is included in the template. Below is a list of features that carry over to a new project based on a template:
- Project Details (Project Name, Number, Address, Description, Start Date, End Date)
- Cost Periods
- Account Codes (from your company only)
- Picklist Option Sets (from your company only)
- Workflows (from your company only)
- Distribution Lists (from your company only)
- Users (from your company only)
- Share Groups (from your company only)
- Form customizations
- Folders
- Merge Templates
- Reports and Dashboards
Although most of the items listed above will come over exactly as set up in your template, there are a number of special rules that are important to understand. Those rules are detailed below:
Project Details
It is recommended that you fill out just the "Project Name" and "Project Number" of your template project. It is also recommended that you provide a generic name and number in this area. Examples include:
- Small Projects Template
- SP-0000
This helps my users identify quickly when they should use this template (for small projects) and what the numbering format should look like (two characters, a dash, and a four-digit number).
When you go to create a new project from a template, the first page that you see, even before the cloning of your template begins, is an editable screen allowing you to change the project details of your new project. You can update all appropriate fields and then click Save to start the cloning process.
Note: You can always change the information defined on the project details page after your new project is created.
Workflows
Workflows that are created on your project template will attempt to come over exactly as defined in your template. In the workflow setup, you can add users and/or distribution lists to each step.
Since all users and distribution lists from your company copy over to your new project, in most cases, there will be no issues.
However, if you have invited another company to your template (not recommended) and included users from that company in your workflow steps, those users will not come over to your new project and, therefore, you will have empty workflow steps on your new project. If this happens, you should edit the workflow configuration to make sure no step is empty before using the workflow on forms.
Note: If you forget to edit an empty step, when that workflow is started, the empty step will fail and return to the previous step.
Account Codes, Picklist Option Sets, Workflows, Users, Share Groups
Each of these features is only included in your project template if they were created or associated with your company. For example, let's say you have 5 users from your company on the template project and you have created 2 custom share groups. Then you have connected to another company (not recommended) on your template and they have 7 users and created 4 custom share groups. When you create a new project from the template, only the 5 users from your company and 2 custom share groups will be included in the new project. New projects created from templates do not automatically create connections, therefore, the 7 users and 4 share groups from the other company will not come over to the new project.
Form Customizations
All forms and fields that you (assuming you are the user creating the new project from the template) have access to will be included in the new project regardless of who originally created them.
There are two main use cases to understand for form customizations:
- Company Forms and Fields - It is recommended that you first create company forms and apply them to your project template. This will ensure all of your forms and fields have common ID's which will help you keep standard reports and merge templates working without having to re-setup on every new project.
- Project Forms and Fields - If you create custom forms and fields at your project level instead of your company level, those forms and fields will still be included in your new project. However, it is important to understand that the ID's of those items will be different from the template to the new project. Therefore, if you have reports and/or merge templates created based on those forms you will need to update them in your new project for them to work. The good news is, the formatting of your reports and templates will be cloned over, so it should be a simple update to copy and paste the new IDs only.
Folders
You can set up a custom folder structure on your projects including parent folders and many subfolders. You can share folders with users from your company on the project to set default access. All folders and associated access will clone from your template to your new project.
Note: Files are not included in the clone.
Merge Templates
Merge templates are a powerful way to print your form data to custom outputs. In some cases, merge templates can take a while to create so it's recommended you include them in your project templates. When you create a new project from a project template, all merge templates that you have access to will be included in the new project. Also, all users from your company that have access to your merge templates will keep access in your new project.
There are two important use cases to understand for merge templates (MTs):
- Merge Templates based on company forms/fields - Will work automatically in your new project
- Merge Templates based on project forms/fields - If you try to run your merge template in your new project, you will not get the desired result. All project fields will show "No Access" in the areas you expect to see field data. This is because your field IDs on the new project are different than they were on your template project. To fix this, just go to the merge template setup page, download the original version, update the fields with your new merge tags, and upload as a new version.
Reports and Dashboards
All reports and dashboards that you have access to on the project will be included in your new project cloned from your template. This includes reports created in the My Reports folder, Company Reports > Custom Reports folder, Company Reports > Standard Reports folder, and System Reports folders.
There are two important use cases to understand for merge templates (MTs):
- Reports based on company forms/fields - Will work automatically in your new project
- Reports based on project forms/fields - All reports and dashboards created using project forms or fields will return an error when you try to run on your new project. To fix this, put the report in edit mode and make sure to update all of the appropriate fields.