If you are creating a Merge Template and need to include photos inside your output rather than attached at the end on separate pages, you can use the "prompt" tag. Common use cases for showing photos in print outputs include Field Reports, Inspections, Daily Work Journals, and more.

Note: The prompt photo tag only works in Merge Templates created using Microsoft Word and Microsoft PowerPoint.
The steps below assume you have a basic understanding of how to create and edit a Merge Template. They are based on step two of a new Merge Template or editing an existing Merge Template using the Get Merge Tags button.
- In the merge tags modal window, click the dropdown and choose the Prompt Fields option.
- You will see a single option labeled Insert Photo. Click the Copy button to copy the tag and paste it into your merge template file.
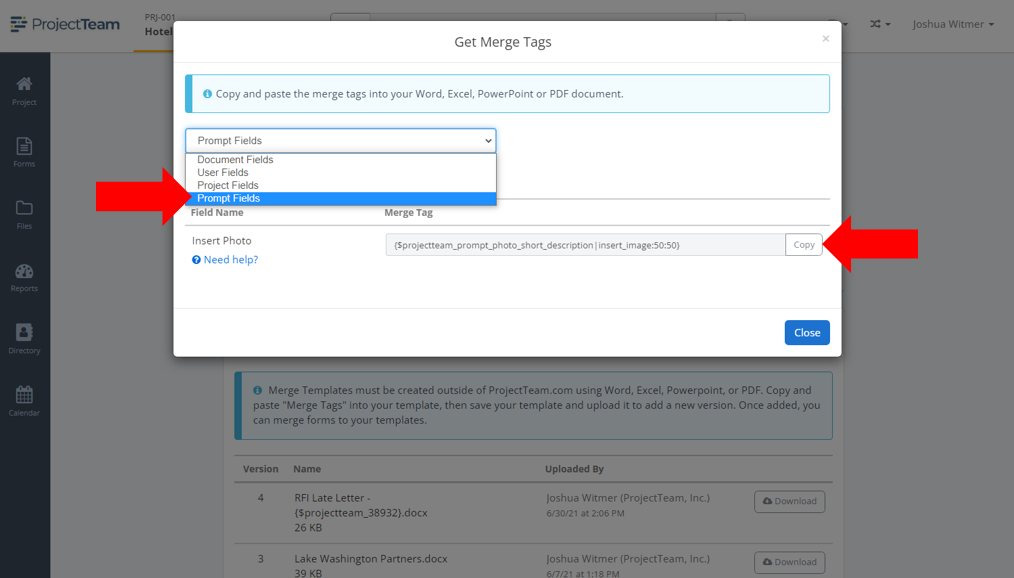
The tag has three different sections to it:
- Keep the first section as is. You must start your prompt photo tag with the "$projectteam_prompt_photo_" text. This tells ProjectTeam.com that there is a prompt tag inside the document and will eventually prompt for that tag during an actual merge.
- Update the second section. This section is where you can define what text you want to display during the prompt. By default, the text displays "short_description" but you should replace that with text that better describes your situation. For example, you might change to something like "photo_1", "inspection_item_1_photo", or "most_important_photo_here". (Note: You must add an underscore character "_" in place of any space characters in your tag. ProjectTeam.com will remove the underscore when prompting during an actual merge.)
- Update the third section. The third section of the photo tag is where you define the width and height of your photo image. By default, there is a size of "50:50" meaning 50 width and 50 height. You can change this to be any size depending on how you want the photos to appear on your template. If you want to set the width but automatically size the height to keep proportions, you can use a "0" for the height like this: {$image|insert_image:300:0}. This means 300 width and auto-calculate the height. If you want to set a maximum height to your image, you would use a tag like this: {$image|insert_image:300:0:0:200}. This means 300 width and auto-calculate the height. No maximum on width, but set a maximum height of 200.
You have successfully added a photo to your Merge Template file. You can proceed by adding other fields to your file or saving your file and preparing it for upload into ProjectTeam.com.
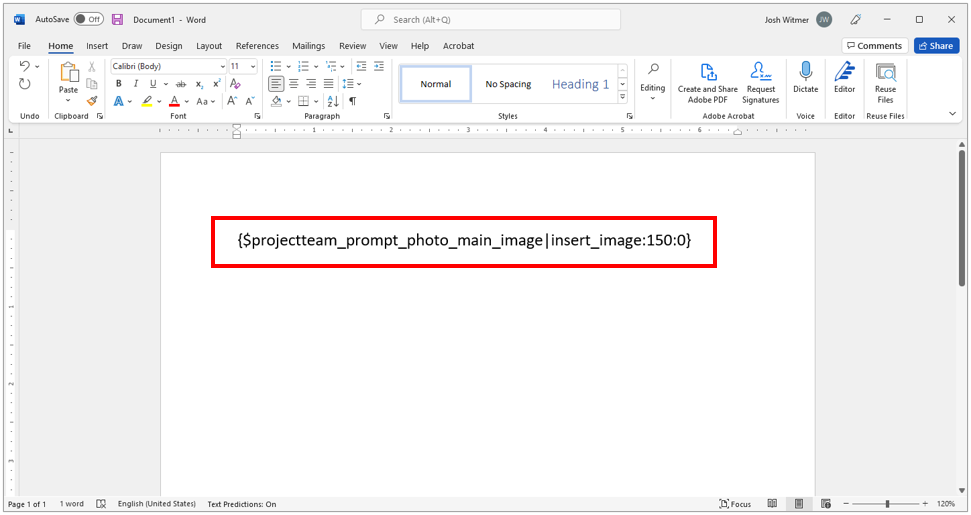
You can include multiple prompt photo merge tags in your Merge Template but they all must have a different short description. For example, if you wanted to show 3 photos in your template, you could add:
-
{$projectteam_prompt_photo_Photo_1|insert_image:150:0}
-
{$projectteam_prompt_photo_Photo_2|insert_image:150:0}
-
{$projectteam_prompt_photo_Photo_3|insert_image:150:0}
Notice the short description for each tag is different but everything else can be the same. You could change the width and height of each photo on your document to be different if needed.
Images in Rows
Depending on your desired template, you may want to put multiple images on a single row. For a common Letter size MS Word document (8.5"x11") we have found the following sizes to work best:
-
Single photo in row: "insert_image:600:0"
-
Two photos in row: "insert_image:300:0"
-
Three photos in row: "insert_image:200:0"
-
Four photos in row: "insert_image:150:0"
Helpful template
We have prepared this template with common multi-photo sizes to help you create your Merge Template file.
Download Photo Size Template - Microsoft Word file will download with various photo merge tag sizes for you to use or copy into your own template
Merge Process
After successfully creating your Merge Template, you can navigate to a form to merge data into your template. ProjectTeam.com will recognize you added prompt tags to your template and prompt for your input during the merge process.
For example, If you added three prompt photo tags to the template, the merge prompt will look like this:
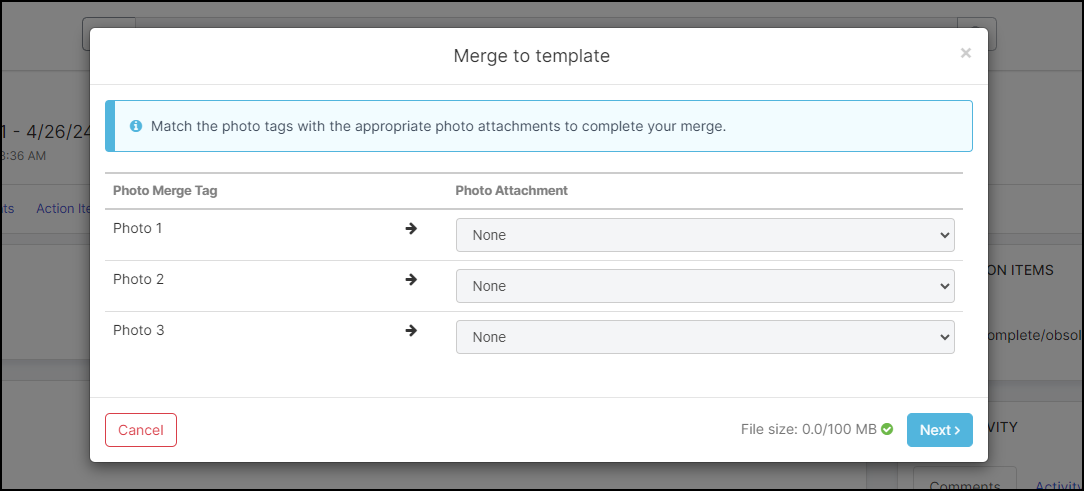
The dropdown list on the right side of the modal window is made up of photo attachments you've included on your form. Photo file types include .jpg, .jpeg, and .png.