The first step in creating a new Payment Application is to choose an existing Contract, and therefore, can only be created after a contract has been established. Payment applications allow you to bill against Schedule of Value items in your Contract and Change Orders associated with that contract.
General Tab
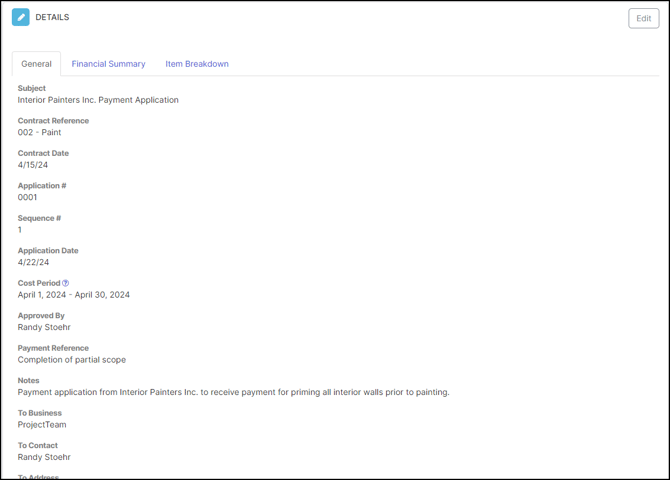
Subject (Required)
Type: Text (Single line)
Details: The subject acts as the title of your Payment Application. In general, it's best to keep the subject short and sweet to serve as a quick reference to the main topic of the form.
Contract Reference
Type: Read-only
Details: The first step in creating a new Payment Application is to choose a Contract. After selecting a Contract, it will be shown in the Contract Reference field and is not editable.
Contract Date
Type: Read-only
Details: The date is auto-populated based on the Contract selected.
Application #
Type: Auto number
Details: Number automatically increments based on the Contract selected. For example, if you already have 3 Payment Applications against a Contract and the are numbered 1, 2 and 3, the next one created will 4. The number will always be one digits more than the previous.
Sequence #
Type: Read-only auto number
Details: Number automatically increments based on the previous Payment Application and there is no way to edit this number. The purpose of this field is to help you understand how many Payment Application have really been created based on the Contract. While the Application # can be edited, the Sequence # can not.
Application Date
Type: Date
Details: This is an important field because it affects the Change Orders that will be counted in the Payment Application. All Change Orders that have an Approved Date less than or equal to the Application Date will be used in calculating the Payment Application's Approved Change Orders (found on the Financial Summary tab).
Cost Period (Required)
Type: Picklist (from Cost Periods in Project Administration)
Details: This picklist is used to keep track of which cost period you are creating the Payment Application against. The options of the picklist must be created before using the field.
Approved By
Type: Project Directory Contact typeahead
Details: After clicking into the field, you are presented with a list of all contacts listed in your Project Directory. Choose the contact that provided approval for the Payment Application. If you do not see the appropriate contact, you can manually type in the name of a person not listed in the Project Directory.
Approved Date
Type: Date
Details: Provide the date that the Payment Application was approved.
Paid Date
Type: Date
Details: Provide the date that the Payment Application was officially paid.
Payment Reference
Type: Text (Single line)
Details: Fill out this field if you have a check number or some other document related to the payment that you would like to track.
Notes
Type: Text (Multi line)
Details: Track all important notes about the payment in this field. For example, if there are reasons for an early or late payment, this field gives you the opportunity to track what you need.
To Business
Type: Read Only
Details: To Business will auto populate with the To Business information from the contract the Payment Application is associated with.
To Contact
Type: Read Only
Details: To Contact will auto populate with the To Contact information from the contract the Payment Application is associated with.
From Business
Type: Read Only
Details: From Business will auto populate with the From Business information from the contract the Payment Application is associated with.
From Contact
Type: Read Only
Details: From Contact will auto populate with the From Contact information from the contract the Payment Application is associated with.
Signed By
Type: Project Directory Contact typeahead
Details: Once the Payment Application has been sent, reviewed and signed, provide the signature of the approver in this field.
Title of Signed By
Type: Text (Single line)
Details: Provide the title of the contact that provided the final sign-off of the Payment Application.
Paid
Type: Checkbox
Details: After the Payment Application has been officially paid, you can mark the form as paid. Warning: This will lock the Payment Application and users will no longer be able to edit the form once it is marked paid.

Financial Summary Tab
All fields on the Financial Summary tab are read-only and are fed from other areas of the system. Most of the information comes from the Item Breakdown tab but you will also find information from the related Contract and Change Orders.
The fields of the Financial Summary tab are consistent with data needed to populate the AIA G702 cover page.
Original Contract Amount
Total value of the original Contract selected when the Payment Application was first created. You can see the name of the Contract on the General tab.
Approved Change Orders (Amount)
The total amount of all approved Change Orders related to the associated Contract and have an Approved Date that is less than or equal to the Application Date of the Payment Application.
Revised Contract Value
The Original Contract Amount plus the Approved Change Orders (Amount)
Total Completed Work
The sum of the Total Work Completed column on the Item Breakdown tab.
Total Materials Stored
The sum of the Materials Presently Stored column on the Item Breakdown tab.
Total Completed and Stored
The Total Completed Work plus the Total Materials Stored.
Retainage on Completed Work (%)
The sum of the Work Retainage ($) column divided by the sum of the Total Work Completed column and then multiplied by 100 to get the percentage number.
Retainage on Completed Work ($)
The sum of the Work Retainage ($) column on the Item Breakdown tab.
Retainage on Stored Materials (%)
The sum of the Materials Retainage ($) column divided by the sum of the Materials Presently Stored column and then multiplied by 100 to get the percentage number.
Retainage on Stored Materials ($)
The sum of the Materials Retainage ($) column on the Item Breakdown tab.
Total Retainage Amount
The Retainage on Completed Work ($) plus Retainage on Stored Materials ($).
Total Earnings Less Retainage
The Total Completed and Stored minus the Total Retainage Amount.
Previous Payments
The Total Earnings Less Retainage from the previous Payment Application.
Current Payment Due
The Total Earnings Less Retainage minus Previous Payments.
Balance Remaining, Including Retainage
The Revised Contract Value minus the Total Earnings Less Retainage.
Approved COs in Previous Pay Apps (Additions)
Total approved change orders greater than zero up to the previous payment application's Application Date.
Approved COs in Previous Pay Apps (Deductions)
Total approved change orders less than zero up to the previous payment application's Application Date.
Approved COs in This Pay App (Additions)
Total approved change orders greater than zero between last payment application's Application Date and this payment application's Application Date.
Approved COs in This Pay App (Deductions)
Total approved change orders less than zero between last payment application's Application Date and this payment application's Application Date.
Total Changes (Additions)
Total approved change orders greater than zero up to this payment application's Application Date.
Total Changes (Deductions)
Total approved change orders less than zero up to this payment application's Application Date.
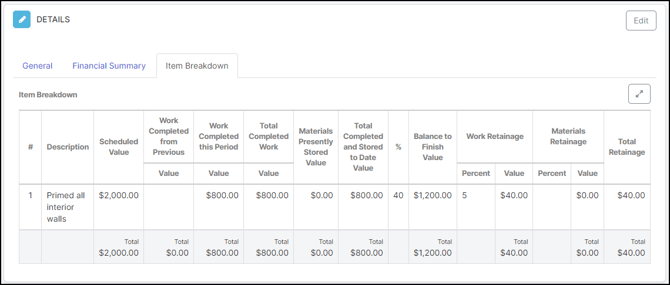
The Item Breakdown tab is originally created based on the selected Contracts Schedule of Values. In addition to the Description and Value, there are fields to enter more information about each row.
Buttons of the Item Breakdown collection
Add Change Orders: Clicking this button opens up a modal that allows you to choose approved Change Orders that are associated with the selected Contract. Once a Change Order is used once, it is not available to be used again (unless removed).
New Line Item: Clicking this button allows you to add new blank rows to the Item Breakdown collection. These new lines are not associated with rows of the Contract's Schedule of Values or existing Change Orders.
Import Rows: Similar to other collections in ProjectTeam.com, you can import new rows to add many very quickly. Clicking this button will take you through the import wizard.
Set Retainage For All Rows: This option allows you to set a retainage percentage for all rows in your collection. Once set, you can manually change each row one-by-one if needed.
Once you have recorded all the needed information and you do not want the Payment Application to be changed anymore, a Project Administrator can approve it. To approve the Payment Application, click the Approve Payment Application button on top of the form in view mode.
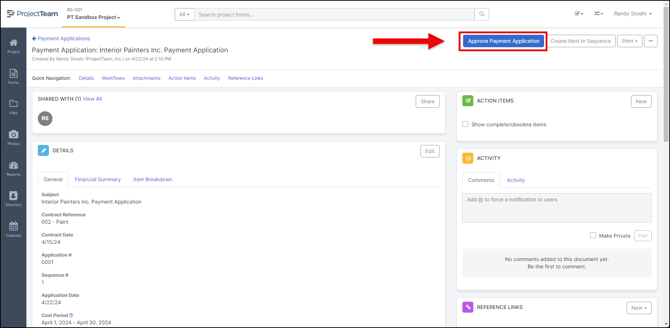
Clicking the Approve Payment Application button will bring up a confirmation modal. The confirmation modal notifies the user that after marking the form final and saving, certain fields will be locked and no additional changes can be made to the Payment Application. Those fields include:
-
Application Date
-
Cost Period
-
Item Breakdown (collection)
In the confirmation modal, you are required to add an "Approved Date". Choose the date that the Payment Application was approved from the calendar picker field. Once complete, click "Yes" to approve and lock the Payment.
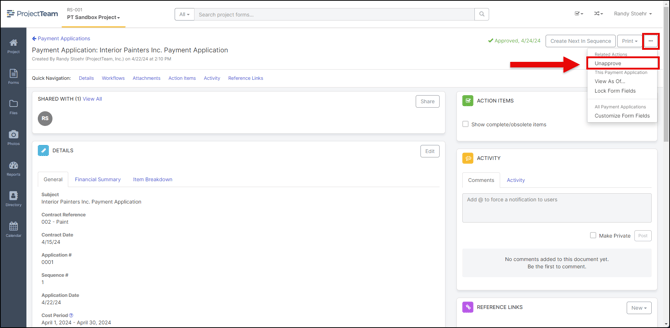
*Note: Only Project Administrators can unapprove forms.
If there has been a mistake and the Payment Application was marked "Approved" prematurely, your Project Administrator can unapprove it to edit again. To unapprove, click the options (...) button on the top right of the Payment Application form in view mode. In the "Related Actions" section of the dropdown, click the Unapprove option.
Note: You can only unapprove the Payment Application that is the latest in its sequence. For example, if you have Pay Apps 1, 2, and 3, and all have been approved, to unapprove 2, you would need to first unapprove 3.
You will be prompted by a confirmation modal asking if you really want to unapprove. If you select Yes, the Payment Application will be unlocked and users will be able to edit again.